By Bill Noble (www.wbnoble.com) Copyright 2006.
This article is copyright W Noble, June 2006. Permission is hereby granted to display and print this article for personal non-commercial use only. For permission to reproduce in quantity, or to use for commercial purposes, please contact the author at william_b_noble@IEEE.org .
I don’t know about you, but one thing I find very annoying is to have a cheap part fail on an expensive car. It’s even worse when the failure is due to a design defect, and it happens over and over. Such is the case with the window switches used on the 993 Porsche (and presumably also on the 964 because the part number begins 964). What happens is that a plastic pin that is part of the switch knob shears off, the switch jams and if you don’t notice it, you can damage or destroy the window lift motor.
A “normal” person would probably just replace the switch, but then you will just have the same failure happen again. My approach produces a permanent solution, and doesn’t require much longer than it takes to go to the dealer and buy the switch.
You do not have to remove the door panel to remove the door switch, at least not on a 993. To remove the switch, pry it away from the door panel with a screwdriver and just pull it out, then disconnect the plug from the back of the switch and it’s out. Be sure you pry between the plastic flange of the switch and the metal ring that is part of the door panel, don’t try to remove the metal ring, it’s there for reinforcement and should not be removed.
 Disassembling
the Switch
Disassembling
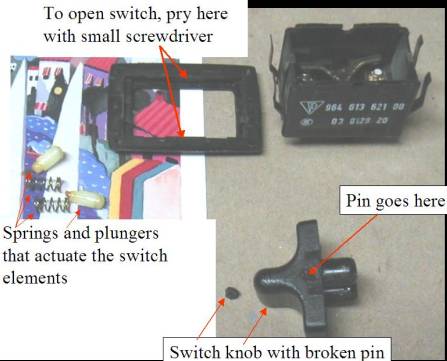
the SwitchTo disassemble the switch, use a small (1/8 or 3/16) screw driver and pry the flange upward – insert the screwdriver in the exact middle of the long side of the switch, and pry to disengage the locking tangs that are on either side of the switch (four tangs total, two on each long side).
Once the flange is loose, place the switch pins down on your work surface and lift the flange off and put it aside. Then lift the switch knob upward and put it aside.
Notice the arrangement of the two brass rockers that are the actual switch mechanism – you may need to reposition them when you go to put it back together, so pay attention. Remove the two white nylon plungers and two small springs from the switch knob and put them aside (see photo). You will be working on the switch knob itself. You may be able to find the broken pin part – if you can, put it aside, you don’t want it to end up inside the switch.
Now we can have some fun. To repair the broken switch knob, you will need a #4 machine screw with a cylindrical head (called “pan head”), a #50 drill, and a file. You will also need a hand drill and a #4 nut.
The first task is to drill a hole in the exact center of where the pin goes using the #50 drill. I used a milling machine to do this, you cannot do it accurately with a power drill or a drill press, the drill will walk around and you will not get the hole in the right place. If you do have a milling machine, just gently grab the pin on the other side of the knob in the vise and align and drill. If you don’t have a milling machine, wrap some tape around the shank of the #50 drill and twist it by hand – you have a lot of control that way, and the plastic is very soft, so you won’t be twisting the drill for more than a minute or two anyway.
 Once you
have the hole, you need to thread it – I happen to have a suitable tap, but
you don’t need one, just CAREFULLY screw the #40 screw into the hole, then
take it back out. You now have a
threaded hole.
Once you
have the hole, you need to thread it – I happen to have a suitable tap, but
you don’t need one, just CAREFULLY screw the #40 screw into the hole, then
take it back out. You now have a
threaded hole.
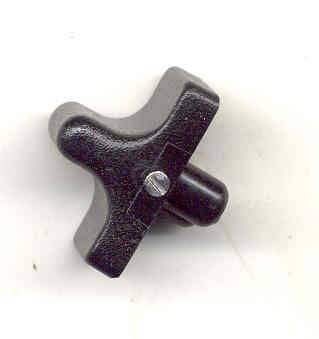
The next step is to machine the screw head to the same diameter as the larger diameter of the remaining pin (on my switches, the pins aren’t round) – I measured 0.112 inches. You will need a pair of calipers or a micrometer to do this correctly, though you can “eyeball it” – the size is very close to the major diameter of the #4 screw.
Place the screw into the #4 nut and hold the nut in the chuck of your hand drill (well, I used a metal lathe, do it that way if you have a metal lathe), and file the screw head while the drill is running until the diameter is the desired value (0.112).
Next, with the drill still running, file the top of the head so that the head protrudes above the nut by the same amount as the pin extends above the plastic of the switch knob (this dimension is not terribly critical, just get it close).
Now, remove the screw from the nut and thread it into the hole in the switch knob. See how much of the screw extends into the hole that you took the spring out of – you need to shorten the screw so that it just barely extends into the hole – I used a small grinder, and held the screw with a pair of needle nose pliers – you can also do this with a hand file.
When the screw is the proper length, put a tiny drop of red Locktite on the threads and thread it into the knob. It should look like the picture.
Now you need to put the switch back together again. Insert the two springs into the two holes they came out of, followed by the plungers. Try to keep the grease from getting all over everything.
Place the switch body “pins down” (maybe it’s still that way because you didn’t mess with it after taking the knob out? Nah, not a chance), and align the two brass contact assemblies correctly. Then place the switch knob into the switch (quickly so the plungers don’t fall out) and press it down so the pins seat in the semicircular cutouts in the side of the switch body.
Then (with the third hand....) place the flange assembly over the switch knob, squeeze the spring steel retaining clips towards the switch body and press the flange down into place (you have to press pretty hard) – you will hear a “click” when the tangs snap into place on each side.
Once the flange is reinstalled, check the spring steel retaining clips to make sure they are sitting in the cutouts made for them in the flange – if not, use a pair of needle nosed pliers to work them into place.
Well, it’s obvious, right? Just go out to the car, plug the switch into the socket and .... WAIT!!! Don’t push it into place yet – test it first – turn on ignition and run the window up and down. If all is well, then push it into place and declare victory.
And, ask yourself – if the original window switches on a 1959 Cadillac have not failed in almost 50 years, why should the switches on a modern car fail in 5? What is it that we have forgotten. And then, pat yourself on the back for a job well done.